Introduction
Data Lifecycle - Predictive Analytics. Using synthetic datasets for an electric car company, we will predict the amount of inventory that may be required for a specific part based on historical part consumption. We will create a pipeline that when new data is collected, it will automatically predict inventory needed for seven (7), fourteen (14) and twenty-one (21) days.
Prerequisites
- Have access to Cloudera on cloud
- Have created a Cloudera workload User
- Ensure proper Cloudera AI role access
- MLUser - ability to run workloads
- MLAdmin - ability to create and delete workspaces
- Basic AWS CLI skills
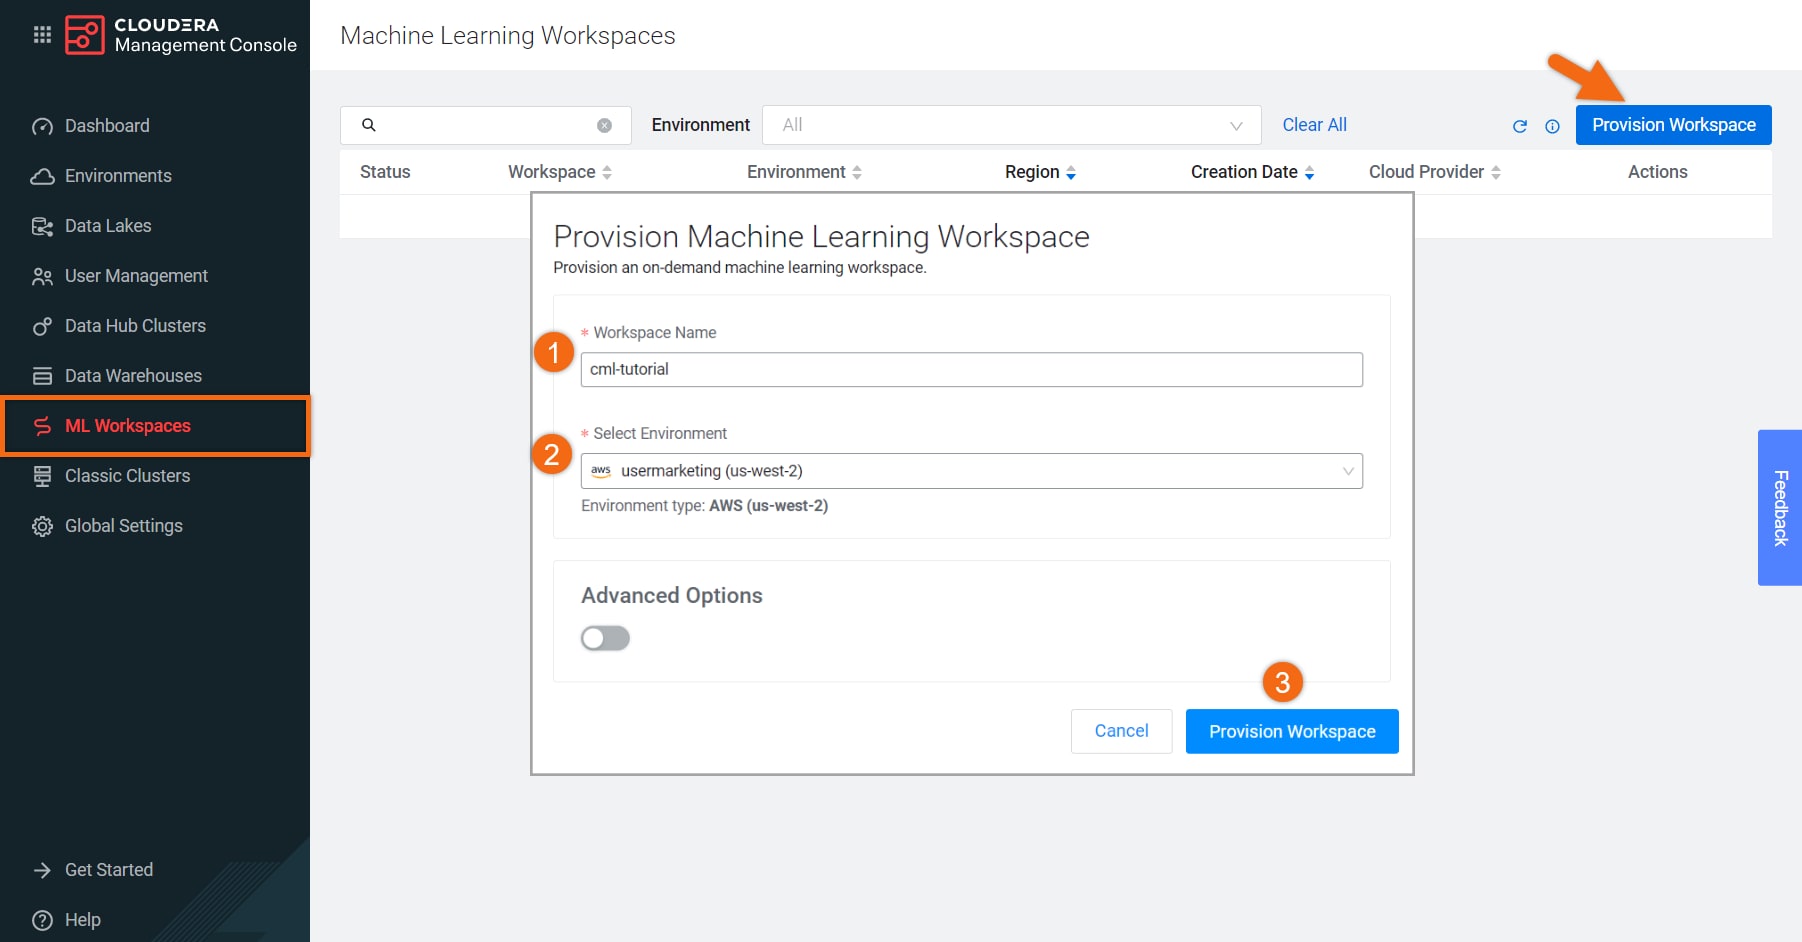
If your environment doesn’t already have a Machine Learning Workspace provisioned, let’s provision it.
Select Machine Learning from Cloudera home page:

In the ML Workspaces section, select Provision Workspace.
Two simple pieces of information are needed to provision an ML workspace - Workspace Name and the Environment name. For example:
- Workspace Name:
Electric-Car-ML - Environment: <your environment name>
- Select Provision Workspace

Beginning from the ML Workspaces section:
- Open your workspace by selecting on its name:
Electric-Car-ML - Select New Project
Complete the New Project form using:
- Project Name:
Electric-Car-Inventory - Project Description:
This project houses machine learning code that creates models that predict the amount of inventory for any given part that should be produced based on historical part consumption and future car production rate. All data within this project is synthetic.
- Initial Setup: Local Files
Upload or Drag-Drop tutorial-files.zip you downloaded earlier - Select Create Project

Now that we have a working machine learning environment, let’s create a session. We will create a workbench editor with a Python 3 interpreter to create and test our model.
Beginning from the Projects section, select your project name, Electric-Car-Inventory.
Select New Session and complete the session form:
- Session Name:
Build Model - Editor: Workbench
- Kernel: Python 3
- Engine Image: <use default>
- Resource Profile: <use default, 1 vCPU / 2 GiB Memory>
- Select Start Session

In the bottom of the session, we will find a command line prompt. Issue the following command to install the dependent libraries for this project (xgboost, sklearn and Faker):
!sh ./cdsw-build.sh
NOTE: You only need to install dependent libraries once - this step can be skipped on future sessions.

Select file, Part_Modeling.py and click on ![]() to run the entire program.
to run the entire program.
Using the datasets provided, a linear regression model will be created and tested.
Now that we’ve created our model, we no longer need this session - select Stop to terminate the session.

We will create a machine learning pipeline that consists of four (4) jobs. When the main job, Collect Data is run, dependent jobs will automatically run; each predicting the number of parts needed in that time.
Beginning from the Jobs section, select New Job and fill out the form as follows:
- Name:
Data Collection - Script:
data_generator.py - Arguments: <leave blank>
- Engine Kernel: Python 3
- Schedule: Manual
- Select Create Job
Repeat using:
- Name:
EV Part Forecast 7 Days - Script:
Part_Modeling.py - Arguments:
12 15 18 a42CLDR 7 - Engine Kernel: Python 3
- Schedule: Dependent, Data Collection
- Select Create Job
Repeat using:
- Name:
EV Part Forecast 14 Days - Script:
Part_Modeling.py - Arguments:
12 15 18 a42CLDR 14 - Engine Kernel: Python 3
- Schedule: Dependent, Data Collection
- Select Create Job
Repeat using:
Name:
EV Part Forecast 21 Days- Script:
Part_Modeling.py - Arguments:
12 15 18 a42CLDR 21 - Engine Kernel: Python 3
- Schedule: Dependent, Data Collection
- Select Create Job

Your machine learning pipeline should look like this:

Now that you’ve created your pipeline, whenever you manually run the Data Collection job, the other three forecasting jobs will run automatically. To see the prediction results for each job, select the job’s name. Take a look at the History and select the Run you’re interested in.
Let’s create three (3) models so that they could be run programmatically from somewhere else.
Beginning from the Models section, select New Model and fill out the form as follows:
- Name:
EV Part Prediction Model 7 Days - Description:
One week prediction - Disable Authentication
- File: model-wrapper.py
- Function: PredictFunc
- Example Input:
{  "model_C_sales": "40"

 ,  "model_D_sales": "82"

 ,  "model_R_sales":"34"

 ,  "part_no": "a42CLDR"

, "time_delta": "7"} - Kernel: Python 3
- Select Deploy Model
Repeat using:
- Name:
EV Part Prediction Model 14 Days - Description:
Two week prediction - Disable Authentication
- File: model-wrapper.py
- Function: PredictFunc
- Example Input:
{  "model_C_sales": "40"

 ,  "model_D_sales": "82"

 ,  "model_R_sales":"34"

 ,  "part_no": "a42CLDR"

, "time_delta": "14"} - Kernel: Python 3
- Select Deploy Model
Repeat using:
- Name:
EV Part Prediction Model 21 Days - Description:
Three week prediction - Disable Authentication
- File: model-wrapper.py
- Function: PredictFunc
- Example Input:
{  "model_C_sales": "40"

 ,  "model_D_sales": "82"

 ,  "model_R_sales":"34"

 ,  "part_no": "a42CLDR"

, "time_delta": "21"} - Kernel: Python 3
- Select Deploy Model

Your models should look like this:

You can now run your model programmatically from almost anywhere - shell, Python, R. Select a model name to test the API.


