Introduction
Experience the benefits of having access to a hybrid cloud solution. Using Cloudera AI (formerly Cloudera Machine Learning) on Cloudera, see how an AI workload compares running on-premises versus leveraging computational resources in the cloud.
Prerequisites
- Have access to Cloudera on cloud
- Have created a Cloudera workload User
- Ensure proper Machine Learning role access
- MLUser: ability to run workloads
- MLAdmin: ability to create and delete workspaces

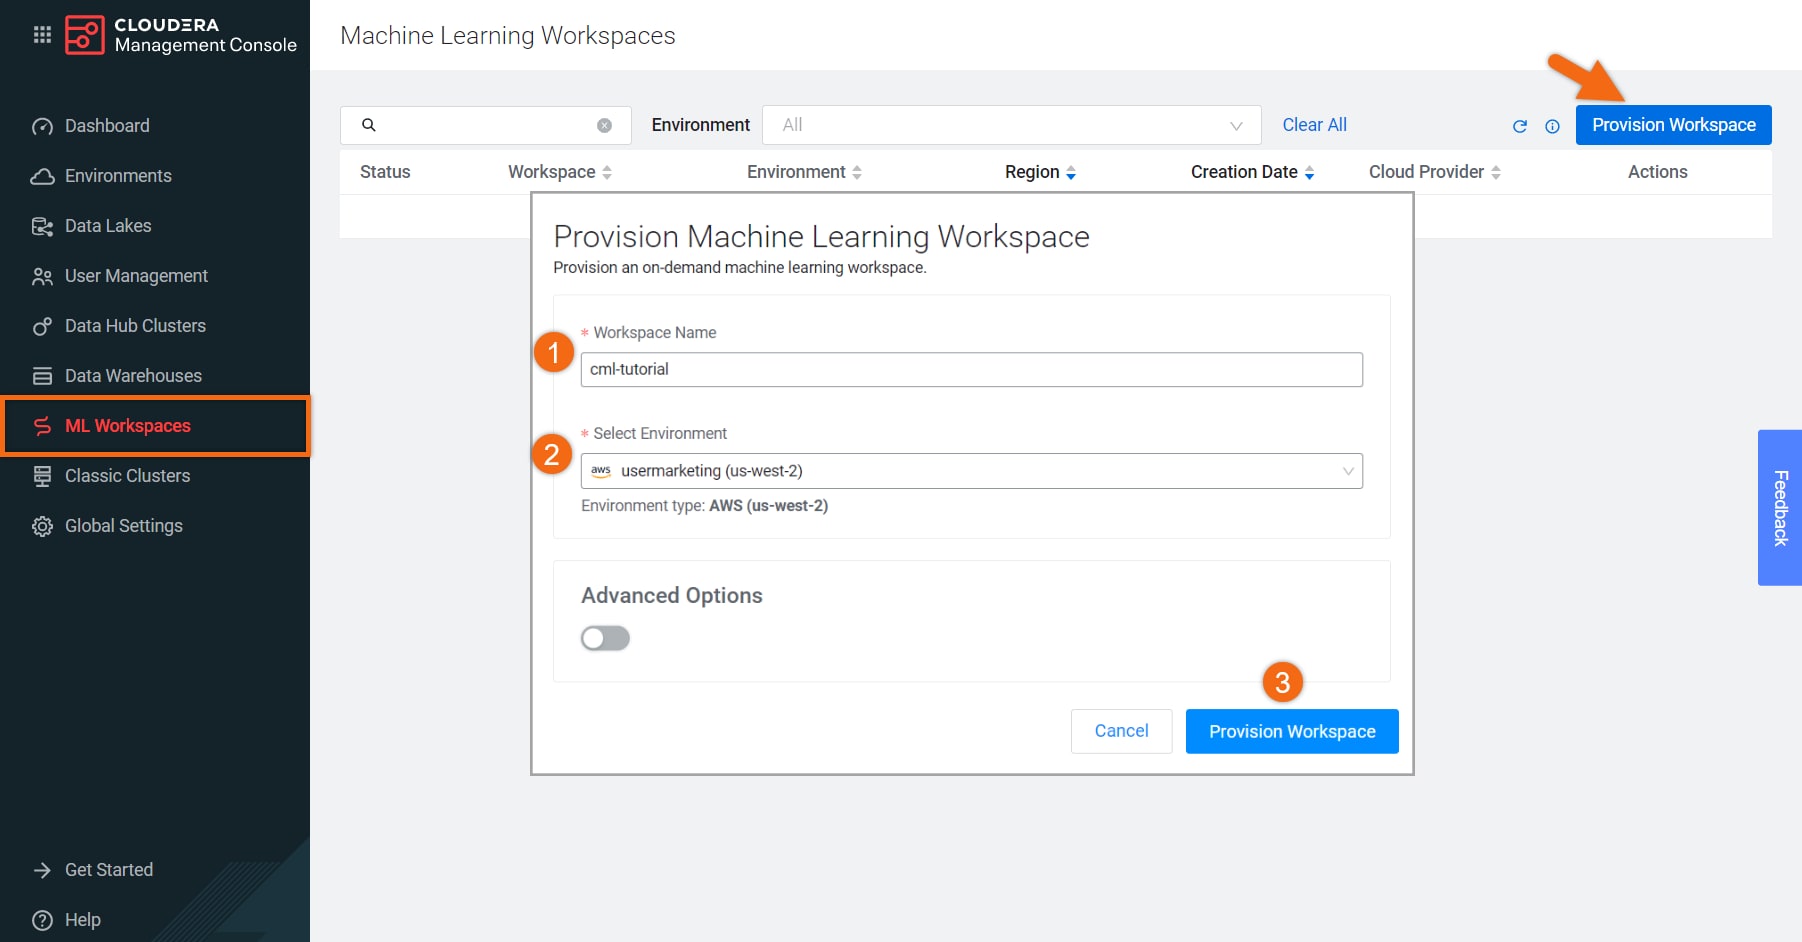
In the ML Workspaces section, select Provision Workspace.
Two simple pieces of information are needed to provision an ML workspace - the Workspace Name and the Environment name. For example:
- Workspace Name:
cml-tutorial - Environment: <your environment name>
- Select Provision Workspace


Create Project
Beginning from the ML Workspaces section, open your workspace by selecting its name, cml-tutorial.
Select New Project.
Complete the New Project form using:
- Project Name:
Transfer Learning - Project Description:
A project showcasing the speed improvements of running heavy AI workloads on-premises versus using GPU resources on the cloud. - Initial Setup: Local Files
Upload or Drag-Drop cml-files folder you downloaded earlier
Select Create Project

Run Experiments
We will create three (3) experiments to verify speed improvements of AI workload and see the effect GPUs have on training the model.
Beginning from the Projects section, select the project name, Transfer Learning.
In the Experiments section, select Run Experiment and complete the form as follows:
- Script:
main.py - Kernel: Python 3.8
- Edition: Nvidia GPU
- Version: 2021.06
- Resource Profile: 2 vCPU / 16 GiB Memory, 0 GPUs
- Comment:
0 GPU - Select Start Run
Similarly, let’s create an experiment using 1 GPUs:
- Script:
main.py - Kernel: Python 3.8
- Edition: Nvidia GPU
- Version: 2021.06
- Resource Profile: 2 vCPU / 16 GiB Memory, 1 GPUs
- Comment:
1 GPU - Select Start Run
Similarly, let’s create an experiment using 2 GPUs:
- Script:
main.py - Kernel: Python 3.8
- Edition: Nvidia GPU
- Version: 2021.06
- Resource Profile: 2 vCPU / 16 GiB Memory, 2 GPUs
- Comment:
2 GPU - Select Start Run

As the experiment results were completing, you could see an order of magnitude difference between having access to GPUs and having to train the model on CPU only.
Your results should be similar to:

The training time utilized for 0 GPU should be comparable to on-premises with no GPUs.
You can review the output of the python program, main.py, by selecting a Run id, then select Session.

Summary
Congratulations on completing the tutorial.
As you’ve now experienced, having access to a hybrid cloud solution allows the opportunity to leverage cloud resources only when you need them. In our experiments, the use of GPUs resulted in huge time savings, empowering users to spend their valuable time creating value instead of waiting for their model to train.
Further Reading
Blogs
Meetup
Other
- Have a question? Join Cloudera Community
- Cloudera AI documentation


