Best Practices Guide for Systems Security Services Daemon Configuration and Installation – Part 1


Background
Authentication is a basic security requirement for any computing environment. In simple terms, users and services must prove their identity (authenticate) to the system before they can use system features. Kerberos provides strong authentication which is used in the exchange between requesting user or process and service during authentication. When a user authenticates to a particular Hadoop component, the user’s Kerberos principal is presented. The principal is presented in the form user@REALM. The Kerberos principal is mapped [1] to a short name after authentication. For example:
user@EXAMPLE.COM --> user
This local user has to be available at the operating system level for both authentication and authorization. Authentication and authorization work hand-in-hand to protect system resources. Authorization is the function of configuring access privileges to services which can be handled in many different ways, from access control lists (ACLs), HDFS extended ACLs, to role-based access control (RBAC) using Apache Sentry or Apache Ranger. These share one commonality: the group membership of the related user has to be known to have access to these methods.
Therefore, consistent group mapping is crucial across the cluster. Each host that belongs to a Cloudera cluster runs an operating system. There are two types of users which are available at the operating system level: service users (yarn, hdfs, etc.) and non-service users. Cloudera recommends that the service users be local users and the non-service users are in LDAP-compliant identity/directory services, such as OpenLDAP or Microsoft Active Directory.
Similarly, when YARN jobs run on the cluster, they are protected from each other by running as the submitting user, thus leveraging Linux’s native process isolation capabilities. The executing user must therefore be available in order for YARN jobs to run in that user’s context. Enabling Kerberos within a cluster activates this security and isolation feature of Hadoop.
The preferred mechanism for mapping directory users and groups is to use tools such as Systems Security Services Daemon (SSSD), Centrify, or PowerBroker to replicate LDAP groups at the operating system level. This blog article provides instructions on how to setup SSSD.
For more information on authorization, see the Cloudera Security [2] documentation.
Group Mapping in Hadoop
Before using the Hadoop services, permissions have to be granted so all the necessary user groups must be mapped to roles. The available groups can be verified with the hdfs groups command. The group check is not verified on your host of invocation, it is done on the host of the service that is required to authorize a given request. The way hdfs groups works is it sends an RPC request with the username to one of the HDFS NameNodes. The related NameNode lists the group membership. Cloudera’s recommended configuration is that HDFS NamaNode queries this information from the local operating system. The plugin that does this is ShellBasedUnixGroupsMapping, which is Cloudera’s default configuration (it can be validated here: Cloudera Manager → HDFS → Configuration → Hadoop User Group Mapping Implementation). The NameNode that received the request will run an id -Gn username command as a forked process on its own host and collect the output of this command.
Figure 1 shows a high-level overview of the related components.
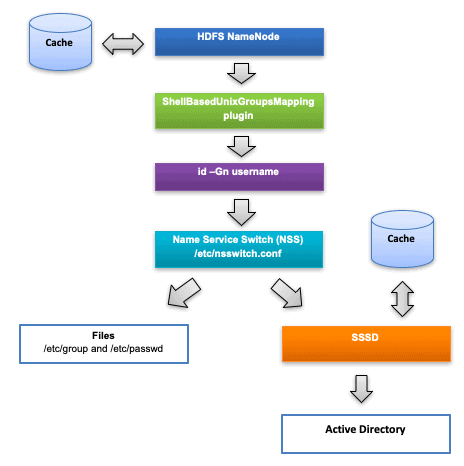
Figure 1: Layers between Active Directory and HDFS NameNode
Using Active Directory as an Identity Provider for SSSD
SSSD is a system daemon. Its main purpose is to provide access to identity and to authenticate remote resources through a common framework that can allow caching and offline support to the system. It provides PAM and NSS modules. SSSD works with different identity providers, including OpenLDAP, Red Hat Directory Server, and Microsoft Active Directory. This blog will only focus on the Active Directory (AD) identity provider. Additional information about other identity providers can be found in the Red Hat SSSD and Identity Providers [3] documentation.
Linux and Windows systems use different identifiers for users and groups. Linux uses UID (User ID) and GID (Group ID), which are compatible with the POSIX standard. Windows uses security IDs (SID). Users authenticating to a Red Hat operating system, including Active Directory users, must have a UID and GID assigned. For this purpose, SSSD provides the following integration methods [4]:
1. Automatically generate new UIDs and GIDs for AD users. SSSD can use the SID of an AD user to algorithmically generate POSIX IDs in a process called ID mapping. ID mapping creates a map between SIDs in AD and IDs on Linux. When SSSD detects a new AD domain, it assigns a range of available IDs to the new domain. Therefore, each AD domain has the same ID range on every SSSD client machine.
In the case of large enterprise customers, the size of the default range is not wide enough and must be adjusted using the following settings:
- ldap_id_mapping
- ldap_idmap_range_min
- ldap_idmap_range_max
- ldap_idmap_range_size
2. Active Directory can store POSIX attributes, such as uidNumber or gidNumber. To use the Active Directory values, the ID mapping must be disabled in SSSD (this can be done with the ldap_id_mapping parameter).
Disclaimer
The solution described below will work with Microsoft Active Directory 2003 and newer when joining a single domain (one realm). If there is more than one domain, further configurations are needed. The solution has been tested on these Redhat distributions: Red Hat Enterprise Linux 6 and 7.
Pre-requisites
- Ensure FQDN (forward and reverse), DNS, NTP and reliable networking between the cluster nodes and Active Directory.
- Ports: The following ports are needed for the AD connection: 88 and 389. Test the connectivity using the nc -v command and verify that these ports are not blocked by a firewall.
- Disable NSCD from caching AD lookups. See the NCSD section below for instructions.
- All groups that are being used should be created in the new organizational unit (OU) (Figure 2). This is necessary only if the OU is used as the group filter too. Typically the Hadoop admin and user related groups get created here.
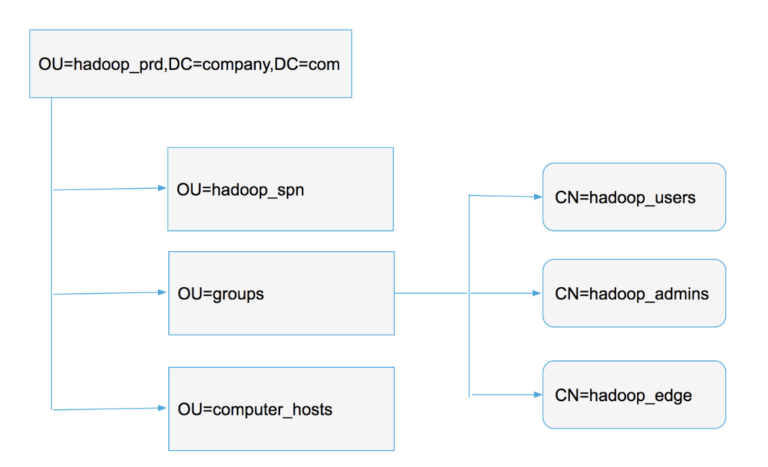
Figure 2: Recommended hierarchy in Active Directory
Red Hat Enterprise Linux 6
Step 1: Prepare the Active Directory for authentication and SSSD
- It is strongly recommended that existing groups are not used.
- Group names containing a space will be handled by the OS as separate group names and should not be used. If for any reason they are used in the OS, they can be validated with the following command: id -Gn username. SSSD has the override_space configuration option. This parameter will replace spaces with the given character for user and group names. However, this configuration option is not available for Cloudera Manager.
- For AD integration, predefined groups should be used (this can be reused for the SSSD configuration). In Figure 2, the 3 groups, hadoop_users, hadoop_admins and hadoop_edge, are the bare minimum requirements. More groups should be added depending on the requirements. The reason you want to have hadoop_edge group is because you will have certain nodes like edge nodes where you want power users to be able to ssh into the nodes. Normally only members of hadoop_admins can login to all the nodes. hadoop_edge gives its member login access to edge nodes. If all users are allowed access to login to the edge nodes then use hadoop_users group.
- Service accounts , such as hdfs and yarn, should be local accounts created by Cloudera Manager (this is enabled by default: Cloudera Manager→ Administration → Settings → Create Users and Groups, and Apply File Permissions for Parcels) and not on the AD. If a service account does not exist locally, or exists both locally and in AD, it could cause issues (such as a specific Cloudera’s Distribution including Apache Hadoop (CDH) service not starting).
Step 2: Set up kerberos client configuration
- SSSD depends heavily on the /etc/krb5.conf file
- The first thing to do is install these packages:
# yum install krb5-workstation krb5-libs
- Use AD integration with the kerberos component
[libdefaults]
default_realm = AD.SEC.EXAMPLE.COM
dns_lookup_kdc = false
dns_lookup_realm = false
ticket_lifetime = 1d
renew_lifetime = 7d
forwardable = true
default_tkt_enctypes = aes256-cts
default_tgs_enctypes = aes256-cts
udp_preference_limit = 1
kdc_timeout = 3000
default_ccache_name = FILE:/tmp/krb5cc_%{uid}

[realms]
AD.SEC.EXAMPLE.COM = {
   kdc = w2k8-1.ad.sec.example.com
   kdc = w2k8-2.ad.sec.example.com
}

[domain_realm]
.example.com = AD.SEC.EXAMPLE.COM
/etc/krb5.conf
The local AD needs to be identified (nearest to the Domain Controller (DC) where CDH is running). Therefore the realm name has to be used (for example, AD.SEC.EXAMPLE.COM). To discover the domain controllers, run the dig command:
$ dig -t SRV _kerberos_tcp.AD.SEC.EXAMPLE.COM

; <<>> DiG 9.9.4-RedHat-9.9.4-29.el7_2.3 <<>> -t SRV _kerberos_tcp.AD.SEC.EXAMPLE.COM
;; global options: +cmd
;; Got answer:
;; ->>HEADER<<- opcode: QUERY, status: NXDOMAIN, id: 19526
;; flags: qr rd ra; QUERY: 1, ANSWER: 0, AUTHORITY: 1, ADDITIONAL: 1

;; OPT PSEUDOSECTION:
; EDNS: version: 0, flags:; udp: 4096
;; QUESTION SECTION:
;_kerberos_tcp.AD.SEC.EXAMPLE.COM. IN	SRV

;; AUTHORITY SECTION:
AD.SEC.EXAMPLE.COM.	3600	IN	SOA	w2k8-1.AD.SEC.EXAMPLE.COM. hostmaster.AD.SEC.EXAMPLE.COM. 15884 900 600 86400 3600

;; Query time: 3 msec
;; SERVER: 172.18.64.15#53(172.18.64.15)
;; WHEN: Fri May 17 15:32:02 CEST 2019
;; MSG SIZE  rcvd: 116
Active Directory forests can be of significant size, with numerous different domain controllers. AD uses the concept of sites [5] to identify the physical location for its domain controllers. This enables clients to connect to the domain controller that is geographically closest, which increases client performance.
To identify the site name, use the cldap.pl perl script (AD.SEC.EXAMPLE.COM is not the site name, it is the AD domain name). After running cldap.pl, the site name will be given for the server and client site name, which in this case is Default-First-Site-Name. There is a perl package dependency for this. First, install this package:
# yum install perl-Convert-ASN1
$ cldap.pl AD.SEC.EXAMPLE.COM -s w2k8-1.ad.sec.example.com


Information for Domain Controller: w2k8-1.ad.sec.example.com

Response Type: SAMLOGON
GUID: 86163d0a-bb74-4757-b9aa-6a918b24ab18
Flags:
	Is a PDC:                                   yes
	Is a GC of the forest:                      yes
	Is an LDAP server:                          yes
	Supports DS:                                yes
	Is running a KDC:                           yes
	Is running time services:                   yes
	Is the closest DC:                          yes
	Is writable:                                yes
	Has a hardware clock:                       yes
	Is a non-domain NC serviced by LDAP server: no
Forest:			ad.sec.example.com
Domain:			ad.sec.example.com
Domain Controller:	w2k8-1.ad.sec.example.com
Pre-Win2k Domain:  	AD
Pre-Win2k Hostname:	W2K8-1
Unk:
Server Site Name:	     Default-First-Site-Name
Client Site Name:     Default-First-Site-Name
NT Version:		     5
LMNT Token:		     ffff
LM20 Token:		     ffff
Example output of cldap.pl
To find the nearest AD domain controllers:
$ dig @w2k8-1.ad.sec.example.com -t SRV _ldap._tcp.Default-First-Site-Name._sites.dc._msdcs.ad.sec.example.com
Step 3: Samba client setup
# yum install samba-client samba-common-tools
Next configure as shown below. Substitute servername accordingly for other nodes. Please note that the NetBIOS name cannot exceed 15 characters.
[global]

netbios name = servername_max_15_characters
workgroup = AD
security = ADS
realm = AD.SEC.EXAMPLE.COM
encrypt passwords = yes
kerberos method = secrets and keytab
/etc/samba/smb.conf
The above configuration may need to be adjusted if your NetBIOS name is longer than 15 characters. This can happen, for example, if you are using AWS machines and end up with a hostname like ip-173-14-XXX-YYY.ec2.internal. In this case, you have to decide how to shorten the hostname in the Samba configuration to conform to the AD limitations on computer object names. The hostname can be changed, but if this is done, be sure to have the correct forward and reverse DNS zones set up so SSSD can update the A and PTR records.
Step 4: Join the server to the domain, using the following command. This example is for node servername.example.com; substitute accordingly for other nodes:
# net ads join createupn=host/$(hostname -f)@AD.SEC.EXAMPLE.COM -S w2k8-1.ad.sec.example.com createcomputer="OU=computer_hosts,OU=hadoop_prd,DC=ad,DC=sec,DC=example,DC=com" -U administrator
Step 5: Verify the krb5 client configurations. If the join is successful check the file /etc/krb5.keytab with the following commands:
# klist -kt /etc/krb5.keytab
# kinit -kt /etc/krb5.keytab host/servername.example.com@AD.SEC.EXAMPLE.COM
We can login to the AD and see the list of servers connected. After the join is successful, if for any reason this file needs to be regenerated, run these commands:
# rm -f /etc/krb5.keytab
# net ads keytab create -S w2k8-1.ad.sec.example.com -U administrator
Step 6: Install and configure SSSD:
# yum install sssd-ad sssd oddjob oddjob-mkhomedir
The libipa_hbac-python package may cause a multilib version problem by the sssd installation on Redhat 6. It is recommended to remove it if it is not used:
# yum remove libipa_hbac-python
Step 7: Configuring SSSD
[sssd]
config_file_version = 2
reconnection_retries = 3
sbus_timeout = 30
services = nss, pam
domains = ad.sec.example.com

[nss]
filter_groups = root,mysql,hadoop,yarn,hdfs,mapred,kms,httpfs,hbase,hive,sentry,spark,solr,sqoop,oozie,hue,flume,impala,llama,postgres,sqoop2,kudu,kafka,accumulo,zookeeper,cloudera-scm,keytrustee
filter_users = root,mysql,cloudera-scm,zookeeper,yarn,hdfs,mapred,kms,httpfs,hbase,hive,sentry,spark,solr,sqoop,oozie,hue,flume,impala,llama,sqoop2,postgres,kudu,kafka,accumulo,keytrustee
reconnection_retries = 3

# entry_cache_timeout = 3600
# entry_negative_timeout = 30
# entry_cache_nowait_percentage = 7

[pam]
reconnection_retries = 3

[domain/ad.sec.example.com]
debug_level = 3

ignore_group_members = true

ad_enable_gc = false
cache_credentials = true
ldap_id_mapping = true

# When override_gid is enabled, the primary group of all the users in the domain is set to the value of override_gid. You must change the override_gid default value.

# override_gid = 999999

# The auto_private_groups option was added in SSSD 1.16.1. If this option is set to true, each user’s GID will be changed to match their UID. Do not enable override_gid and auto_private_groups at the same time.

# auto_private_groups = true

use_fully_qualified_names = false
full_name_format = %1$s
fallback_homedir = /home/%u
default_shell = /bin/bash

krb5_realm = AD.SEC.EXAMPLE.COM
ad_domain = ad.sec.example.com
id_provider = ad
chpass_provider = ad
auth_provider = ad

# Cloudera recommends that you enable ad_site by specifying an Active Directory site with the ad_site option. When ad_site is enabled, SSSD discovers valid AD servers for the site and updates the server list automatically when the AD servers change. You do not have to hardcode the servers with the ad_server option.

ad_site = Default-First-Site-Name

case_sensitive = false
ldap_schema = ad
ldap_user_principal = nosuchattr
ldap_force_upper_case_realm = true
ldap_purge_cache_timeout = 0
ldap_account_expire_policy = ad

# Setting subdomains_provider to none disallows fetching subdomains explicitly. This can help resolve significant delays if there are multiple AD domains. Note that there is a known issue in versions of RHEL 6. For more information, see https://bugzilla.redhat.com/show_bug.cgi?id=1221358

# subdomains_provider = none

ldap_group_search_base = OU=groups,OU=hadoop_prd,DC=ad,DC=sec,DC=example,DC=com
ldap_user_search_base = DC=ad,DC=sec,DC=example,DC=com?subtree?(memberOf=CN=hadoop_users,OU=groups,OU=hadoop_prd,DC=ad,DC=sec,DC=example,DC=com)

# Use the ad_access_filter option to specify groups that can login to the host via SSH. The default setting gives SSH access to members of the hadoop_admins and hadoop_users groups. Use this setting with caution.

access_provider = ad

ad_access_filter = (|(memberOf=CN=hadoop_admins,OU=groups,OU=hadoop_prd,DC=ad,DC=sec,DC=example,DC=com)(memberOf=CN=hadoop_users,OU=groups,OU=hadoop_prd,DC=ad,DC=sec,DC=example,DC=com))

# Uncomment the following lines if you are deploying on Azure, which has no reverse DNS, or if your environment has DNS managed by Active Directory.

# dyndns_update = true
# dyndns_refresh_interval = 43200
# dyndns_update_ptr = true
# dyndns_ttl = 3600

ldap_use_tokengroups = false

# Setting krb5_validate to false speeds up the login procedure by preventing TGT verification.

krb5_validate = false

# In environments with a large number of users and groups, you must set the idmap range with the ldap_idmap_range_size option.

# ldap_idmap_range_size = 2000000

ldap_sasl_authid = host/host1.example.com@AD.SEC.EXAMPLE.COM
/etc/sssd/sssd.conf
If you know that the users and groups will be limited to a specific subsection of the directory, you can limit lookups with the ldap_group_search_base and ldap_user_search_base parameters. This can give significant performance improvements for large directories.
Step 8: The authconfig tool simplifies configuring /etc/nsswitch.conf and the configuration files for the PAM libraries for use by SSSD. Login can be controlled with the ad_access_filter property. Make sure only the required groups/users can login across the cluster. For example: it may be only be required that a group called hadoop_admin login via ssh on the Cloudera Manager node. The main reason for doing this is perimeter security.
The SSSD configuration should be owned by root:root and the permissions for the file should be 600. After the /etc/sssd/sssd.conf file is configured correctly and with the right owner and permissions, run the command:
# authconfig --enablesssd --enablesssdauth --enablemkhomedir --update
Step 9: Verification of SSSD configurations, login using your AD account on the node:
$ id joe
uid=686813494(joe) gid=686800513(domain users) groups=686800513(domain users),686821988(hadoop_users),686833005(hadoop_admins)
The domain users group is usually the primary group ID. If you correctly override it with override_gid, it should not appear unless you have specifically added the users to that group. If your group filter is correct, it does not search the organization unit where domain users exist and it will be filtered out.
Red Hat Enterprise Linux 7
Step 1: The above procedure with Samba will work with EL7 as well, but using realmd is an easier way to connect to AD:
# yum install realmd sssd sssd-ad oddjob oddjob-mkhomedir adcli krb5-workstation openldap-clients
Step 2: You need to get the domain using dig and cldap commands. Please refer to Step 2 in the Red Hat Enterprise Linux 6 section above.
Step 3: Restart the messagebus service, otherwise the realmd service will not start:
# systemctl restart messagebus
Step 4: Restart the realmd service:
# systemctl restart realmd
Step 5: If you know the domain, please join with your Active Directory credentials:
# realm join ad.sec.example.com --user-principal=host/$(hostname -f)@AD.SEC.EXAMPLE.COM --computer-ou="OU=computer_hosts,OU=hadoop_prd,DC=ad,DC=sec,DC=example,DC=com" --computer-name=$(hostname -s) --membership-software=adcli --user administrator
Note that the computer name cannot exceed 15 characters. You should configure the /etc/sssd/sssd.conf file as explained in the Red Hat Enterprise Linux 6 section (Step 7). For more information, see the Red Hat Enterprise Linux 7 Windows Integration Guide.
Further information about SSSD configurations can be found in the related man pages:
man sssd.conf
man sssd-ad
and in the SSSD documentation:
- https://docs.pagure.org/SSSD.sssd/users/ad_provider.html [6]
- https://docs.pagure.org/SSSD.sssd/users/faq.html [7]
Please note, as SSSD is not included with Cloudera CDH, further support or assistance with this can be found in the Redhat community and mailing lists.
Name Service Caching Daemon (NSCD) Configuration
Cloudera recommends that you install NSCD alongside SSSD to reduce the time required for host name resolution, and to disable the following options listed below in NSCD configuration. Only hostname caching is required. Passwd and group caching may lead to inconsistent results and missing entries. For example, id would not return any group memberships might say that the <username> does not exist.
| enable-cache | hosts | yes |
| enable-cache | services | no |
| enable-cache | netgroup | no |
| enable-cache | passwd | no |
| enable-cache | group | no |
/etc/nscd.conf
Troubleshooting tips
Tip 1: If the group resolution is slow, you will see messages similar to these in the HDFS Namenode log:
WARN org.apache.hadoop.security.Groups: Potential performance problem: getGroups(user=john) took 314611 milliseconds.
This can cause timeouts and some of the users will not be able to access the services. Should you wish to debug this, run multiple timing tests for id -Gn and hdfs groups from multiple hosts to validate where this delay is originating (we recommend running them firstly on the HDFS Namenode hosts; the reason behind this is summarized in the Group Mapping in Hadoop section above).
$ time id -Gn testuser
$ time hdfs groups testuser
If there is high latency to directory servers, this can be disruptive to cluster performance. In extreme cases, HDFS NameNode and YARN Resource Manager failovers can occur. These are the recommended approaches to fix the latency issues:
- Only use datacenter local servers (not overseas / across a WAN circuit)
- Add cluster-dedicated directory / Kerberos servers to minimize latency
- Keep loads reasonable on these servers – add more servers if they are overloaded
- If there are no resources for the extra node(s), caching can be configured. Set SSSD and/or HDFS NameNode to cache entries. Cache timeout can be set high with low refresh offset to make sure changes are synched as soon as possible. If HDFS NameNode caching is also set to close to the refresh offset, the calls from NameNode to SSSD can trigger background cache refresh after every query while entries are still served from cache not affecting the stability.
Recommended SSSD configuration:
| entry_cache_timeout=3600 | # source configuration |
| entry_negative_timeout=30 | # [nss] configuration |
| entry_cache_nowait_percentage=7 | # [nss] configuration |
For example, if the domain’s entry_cache_timeout is set to 3600 (seconds) (1h) and entry_cache_nowait_percentage is set to 7 (percent), entries that come in after ~4 minutes ( 3600s*7% = 252s = 4m 12s) past the last cache update will be returned immediately, but SSSD will go and update the cache on its own, so that future requests will not need to block waiting for a cache update.
Recommended HDFS NameNode configuration:
hadoop.security.groups.cache.secs=300
hadoop.security.groups.negative-cache.secs=30
hadoop.security.groups.cache.background.reload=true
hadoop.security.groups.cache.background.reload.threads=5
For example the NameNode request to update its cached entries after the configured 300 seconds (5 minute) timeout would always trigger a background, non-blocking cache refresh for SSSD if the last cache update nowait period is less than that – 4m 12s in our case.
Tip 2: If you get a similar error message as the one below, from the id command, it means that the group id cannot be mapped with the group name. The possible causes are that the group does not exist or the group has a different ID number. It is recommended to keep all group names and IDs consistent across the CDH hosts.
id: cannot find name for group ID 63144
Tip 3: Change the log-level in the sssd.conf using debug_level=8 and go to /var/log/sssd and verify. Valid log-levels range is between 0 and 9. All sections can have individual log-level configuration.
Tip 4: If the home directory cannot be created but the login works, check /etc/ssh/sshd_config and ensure “UsePAM Yes” Set this to ‘yes’ to enable PAM authentication, account processing, and session processing.
Tip 5: See the Pagure Debugging and Troubleshooting SSSD [8] documentation and the Red Hat Troubleshooting SSSD [9] documentation for additional troubleshooting information.
Conclusions
SSSD is a widely used and accepted solution. However, if it is not configured correctly, your users may not be able to access the big data services. Therefore it is advised to review your current SSSD configuration and to apply it during new cluster deployments. In Part 2, we will cover how these tasks can be automated on all hosts:
- SSSD installation and configuration
- Troubleshooting
Acknowledgments
This blog post was done in collaboration with many Clouderans. We would like to thank all the people who were involved, including Gabor Roczei, Mubashir Kazia, Manish Maheshwari, Manoj Shanmugasundaram, Andre Araujo, Cheng Wang, David Kemp, Ben Gooley, Todd Grayson, Tristan Stevens, Ben Spivey, Harsh Chouraria, Matyas Orhidi, Alex Moundalexis, Vijaykumar Singh, Kevin Risden, Gergely Tomka, Peter Orova, Adriano Simone, Laszlo Stuber, Janos Kovacs, Eddie Johnson, Ali Bajwa, Sean Roberts, Srikanth Venkat, David Villarreal, Ana Gillan, Gabor Gyulai, Tom Wheeler, Coral Waters and Shelby Khan.
References
[1] https://www.cloudera.com/documentation/enterprise/latest/topics/cdh_sg_kerbprin_to_sn.html
[2] https://www.cloudera.com/documentation/enterprise/latest/PDF/cloudera-security.pdf
[6] https://docs.pagure.org/SSSD.sssd/users/ad_provider.html
[7] https://docs.pagure.org/SSSD.sssd/users/faq.html
[8] https://docs.pagure.org/SSSD.sssd/users/troubleshooting.html